As the days grow longer and temperatures begin to rise, gardeners everywhere are gearing up for another fruitful growing season. Tasks like starting seeds indoors, planning garden layouts, and cutting back plants before they break dormancy are likely already underway. However, one essential step that often gets overlooked is ensuring your gardening tools are in top shape for the season—especially your Behlen Country Rotary Tiller. To help you hit the ground running, we’ve outlined key tips and steps to get your tiller ready for action.
Initial Setup
When your Behlen Country Rotary Tiller arrives, it’s important to note that it’s not shipped with oil. Before using the tiller, follow these steps to add 80W-90 gear oil and ensure all parts are properly lubricated:
Add Oil to the Side Gearbox
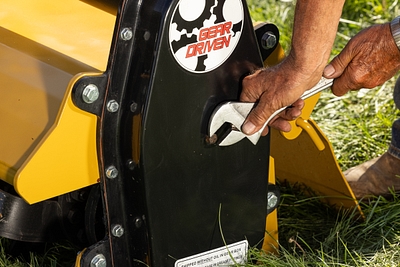
- Remove the top vent plug using a 7/8” wrench.
- Remove the side plug with a 9/16” wrench.
- Add gear oil through the top hole until oil seeps out of the side oil level hole (approximately 2 quarts).
- Wipe away any excess oil from the side of the gearbox and replace the plugs.
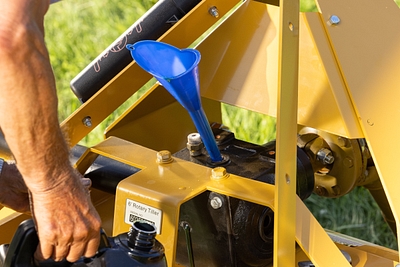
Add Oil to the Top Gearbox
- Remove the top vent plug and side oil level plug as above.
- Add approximately 1 quart of gear oil until it seeps out of the side oil level hole.
- Replace both plugs and clean any residual oil from the gearbox.
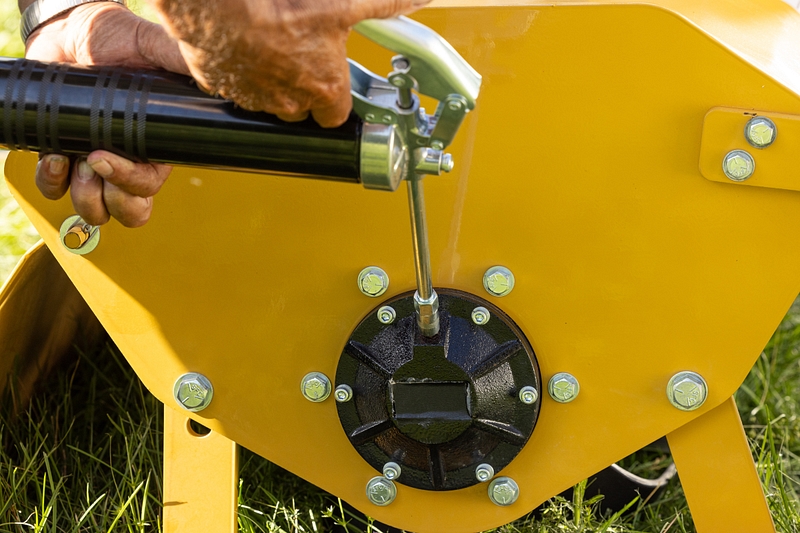
Lubricate All Grease Zerks
- Side Hub: On the side opposite the gearbox, use a grease gun to apply about 20 pumps of grease to the zerk.
- PTO Shaft: Locate two grease zerks, one on the implement side and one on the tractor side, and lubricate both thoroughly.
Note: Some tractors may require the PTO shaft to be cut to size. Refer to your owner’s manual for detailed instructions on how to adjust the shaft.
Maintenance and Use
Proper maintenance is key to ensuring your tiller operates efficiently throughout the season. Before each use, take a few moments to perform the following checks:
- Check Gearbox Oil Levels: Make sure the top and side gearboxes are topped up with oil.
Grease Zerks: Lubricate all grease zerks as needed.
Side hub grease zerk. - Clean Vent Plugs: Ensure vent plugs are free from dirt and debris.
- Clean with parts cleaner and blow air from the inside out.
- Adjust Skids: Set the skids to achieve your desired tilling depth. (Insert how to video)
- Adjust the Tailgate: Position the tailgate to float just above the tilled soil. This helps prevent rocks and debris from flying out and assists in leveling the soil.
- Inspect the PTO Slip Clutch: Over time, the PTO slip clutch may need adjustment due to normal wear and tear. See your owners manual for slip clutch adjustment instructions.
- Check Tines: After each use, inspect the tines for debris that may have wrapped around them. While tines are self-sharpening, any cracked or damaged tines should be replaced. Purchase replacement tines here.
- Lower the Kickstand: Before disconnecting the tiller from your tractor, lower the kickstand to keep the unit stable and prevent it from tipping over.

Use the kickstand to keep the tiller upright when not in use.
Customer Support
If you have any questions about setting up, maintaining, or operating your Behlen Country Rotary Tiller, our customer service team is here to help. Feel free to give us a call at 800-447-2751.
By taking the time to properly set up and maintain your tiller, you’ll ensure it’s ready to break ground when the gardening season begins. Happy tilling, and here’s to a productive and enjoyable growing season!
